Measuring for a Hidden Door: The Master Artisan’s Guide to a Perfect Fit
A single sixteenth of an inch is the only thing standing between a seamless architectural marvel and a frustratingly obvious mistake. You've likely spent hours envisioning a secret study or a concealed pantry, only to feel a pang of anxiety when you finally pick up the tape measure. It's a common fear among homeowners. A custom bookcase door represents a significant investment in your home's character, and the thought of ordering the wrong size is enough to stall any project. Mastering the technical art of measuring for a hidden door is the fundamental engineering step that creates the illusion of a truly invisible entrance.
We understand that the transition from dreaming to doing requires absolute precision. This guide provides a foolproof set of instructions to ensure your secret door operates flawlessly and maintains a perfect seal. You'll gain the confidence to place a custom order by learning the critical differences between a rough opening and finished door size. We will also examine how your wall depth affects the swing and how to calculate floor clearance for heavy, functional pieces. By the end of this artisan's guide, you'll have everything you need to transform a standard doorway into a masterpiece of concealment.
Key Takeaways
Understand why a 1/8-inch margin of error is the critical difference between a hidden masterpiece and a visible doorway.
Learn the technical process of measuring for a hidden door by identifying the Rough Opening within your home's structural framing.
Navigate the specific challenges of retrofitting an existing space versus designing for new construction to maintain seamless architectural integrity.
Identify the four essential measurement points required to ensure your heavy bookcase door clears the floor and operates with silent precision.
Gain the confidence to select premium wood species and finalize your custom Alpha Door order with professional accuracy.
The High Stakes of Precision: Why Hidden Doors Require Exactness
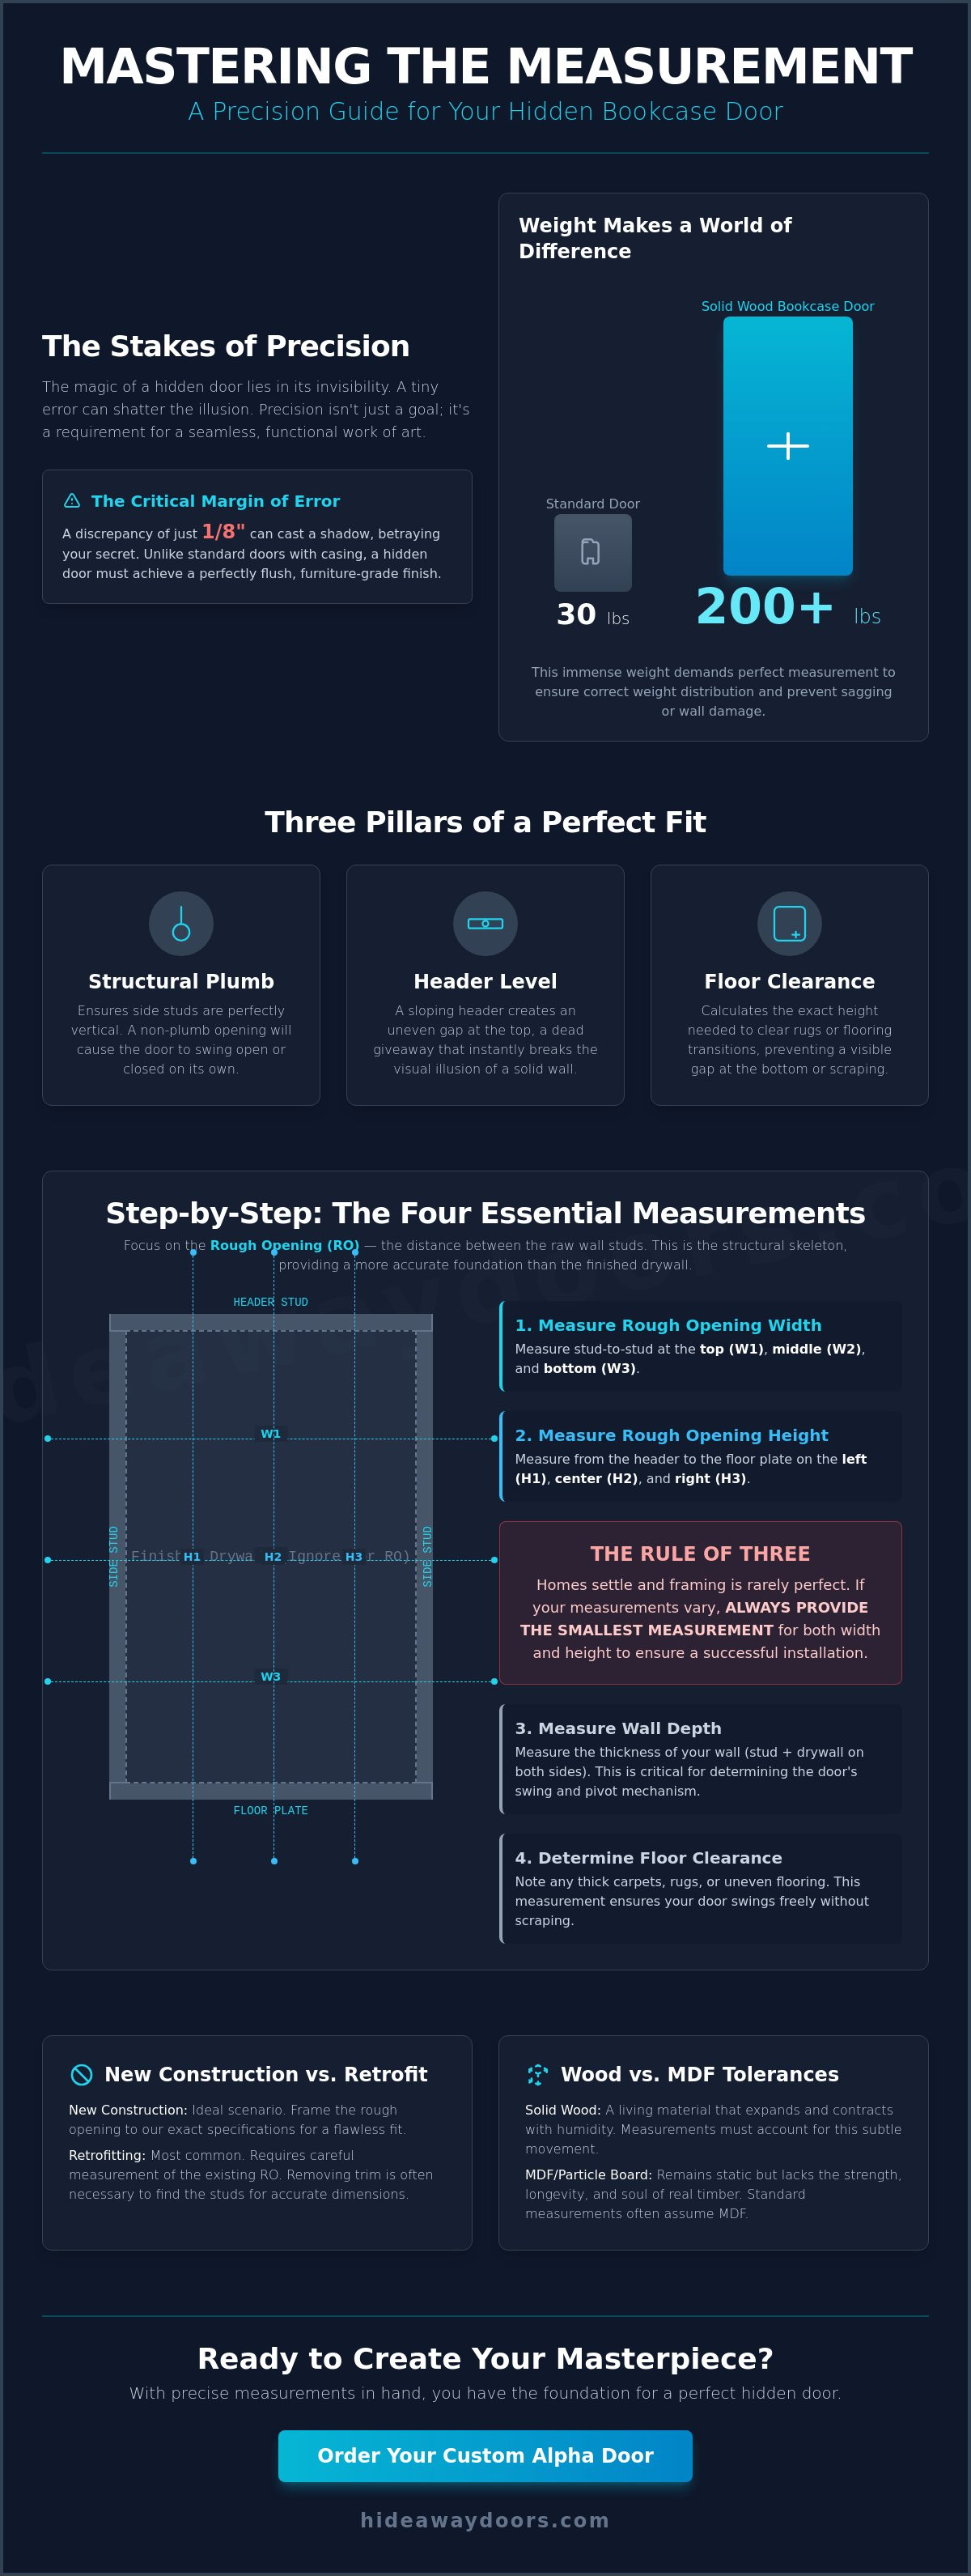
The magic of a secret room relies entirely on a single, unbroken line. When you're measuring for a hidden door, you aren't just checking if a slab fits into a hole. You're calculating what master builders call the Illusion of the Seam. A discrepancy of just 1/8 of an inch can cast a shadow that catches the eye, betraying the location of your private sanctuary. Unlike standard interior doors that hide behind thick decorative casing, a high-end hidden door must achieve a furniture-grade, flush finish. It's the difference between a functional utility and a work of art.
Weight is the silent factor many homeowners overlook during the planning phase. A standard hollow-core door weighs roughly 30 pounds. In contrast, a handcrafted, solid wood bookcase door can easily exceed 200 pounds once you fill the shelves with your favorite volumes. This massive difference in mass places immense stress on the wall's structural framing. Precision in measurement ensures that the door’s weight is distributed correctly across the hinges and the floor. If the opening is even slightly out of square, a heavy door will sag over time, ruining the seal and potentially damaging your drywall.
To achieve a perfect fit, you must account for three critical structural elements:
Structural Plumb: Ensuring the side studs are perfectly vertical so the door doesn't swing open or closed on its own.
Header Level: A sloping header will create an uneven gap at the top of the door, immediately breaking the visual illusion.
Floor Clearance: Calculating the exact height needed to clear rugs or hardwood without leaving a gaping hole at the bottom.
Real Wood vs. MDF Tolerances
Natural timber is a living material. It breathes, expands, and contracts with the changing seasons and shifting humidity levels. This is why Solid Wood Bookcase Doors: Why Real Timber is Non-Negotiable for those seeking longevity and beauty. Standard big-box store measurements assume you're using lightweight MDF or particle board, which remains static but lacks the soul and strength of real wood. When measuring for a hidden door made of real oak, alder, or cherry, we must account for these subtle shifts to prevent the door from sticking during the humid summer months.
The Concealment Gap Explained
Every door requires a "swing gap" to clear the frame as it opens. In the world of historical secret passages, the goal was always to minimize this gap until it became invisible to the naked eye. We utilize advanced pivot hinges to keep this clearance as tight as possible. A perfectly measured opening allows for a gap so narrow it mimics the natural joinery of surrounding cabinetry. This precision creates a powerful psychological effect. When the lines are perfect, the mind simply refuses to see a door where it expects to see a wall.
Understanding the Rough Opening (RO): The Foundation of Your Door
The Rough Opening, commonly referred to as the RO, is the structural skeleton of your project. It represents the clear distance between the raw wall framing, specifically the wood or metal studs, before any drywall or decorative trim is applied. While some general guides suggest measuring the finished drywall opening, we recommend measuring directly from the framing whenever possible. Drywall is often inconsistently applied, and mudded corners can create false dimensions that lead to a cramped, difficult fit. By focusing on the structural bones, you ensure your installation aligns with professional Architectural Woodwork Standards.
Precision requires redundancy. When measuring for a hidden door, you must employ the Rule of Three. This means taking your width measurements at the top, middle, and bottom of the opening. Similarly, you should capture the height at the left, center, and right. It's rare to find a doorway that is perfectly square. Homes settle over time, and even new builds can have slight deviations in the framing. If you find varying numbers across your three points, always defer to the smallest measurement. Ordering based on the tightest point ensures the unit will slide into place without requiring you to plane down the structural studs.
Determining Your Actual Door Size
To determine your actual door size, follow our master artisan's formula: subtract 2 inches from both the width and height of your smallest RO measurement. For example, if your smallest width measurement is 32 inches, you should order a 30-inch door. This 2-inch buffer isn't arbitrary. It provides the necessary clearance for the door jamb and allows your installer room for shimming. Shims are essential for leveling the unit perfectly within an imperfect wall, ensuring that the heavy bookcase remains plumb and the secret remains safe.
Identifying Load-Bearing Studs
A fully loaded Alpha Door demands a foundation of strength. You must identify whether you are working with standard wood studs or light-gauge metal framing. Wood provides superior bite for the heavy-duty lag bolts required for our pivot systems. Additionally, verify the header framing, which is the horizontal beam at the top of the door. This area must be solid and capable of supporting the vertical load without bowing under the weight of the door. If you're measuring for a hidden door in a space with metal studs, you'll need to plan for wood blocking to provide the necessary structural integrity.
Measuring for New Construction vs. Retrofitting Existing Openings
Approaching a new build is a master artisan's dream. It offers a blank slate where every stud can be placed with the final concealment in mind. When you're measuring for a hidden door in new construction, you have the luxury of aligning your structural framing perfectly with the surrounding cabinetry or wall features. This pre-planning phase is the best time to ensure the floor is perfectly level and the header is reinforced. It allows you to create a seamless transition that makes the door indistinguishable from the rest of the room's architecture.
Retrofitting a hidden door into an established home presents a different set of hurdles. You aren't just measuring a hole; you're navigating the legacy of the original builder. Existing casing, decorative molding, and baseboards are the primary enemies of invisibility. To achieve a flush, furniture-grade finish, you'll almost certainly need to strip away the existing trim to expose the raw studs. This process allows you to capture the true Rough Opening dimensions. When modifying an older structure, adhering to professional standards for retrofitting existing openings ensures the structural integrity of the wall is maintained while you prepare for your new entrance. For those looking to see how these challenges are overcome in real-world scenarios, exploring Hidden Door Design Ideas can provide the necessary inspiration for your retrofit project.
Calculating Wall and Jamb Depth
Total wall thickness is the sum of your structural stud plus the drywall on both sides. This measurement is critical because it dictates your jamb depth. A standard 2x4 wall with 1/2-inch drywall typically requires a 4-9/16" jamb. If you have 2x6 framing, you'll likely need a 6-9/16" jamb. This depth is vital for the pivot point of the hinge. If the jamb is too shallow, the door won't have the clearance to swing fully; if it's too deep, the "illusion of the seam" is shattered by an oversized gap. Always measure the total depth at multiple points to account for uneven drywall mudding.
Measuring from an Existing Door
If you have an existing door that fits well, you can use its dimensions as a baseline. However, don't assume the frame is square just because the current door closes. Homes settle. A frame that was perfect twenty years ago may now be skewed. Use your current door's width and height as a starting point, but you must still verify the Rough Opening by measuring for a hidden door directly against the studs. This verification prevents the frustration of ordering a custom Alpha Door only to find the original framing has shifted into a trapezoid shape over time.
Step-by-Step: Capturing the Four Essential Measurements
Precision is the hallmark of a master artisan. When you begin the physical process of measuring for a hidden door, you're translating the raw dimensions of your home into a blueprint for a custom-built machine. This isn't a task to be rushed with a plastic tape measure and a vague estimate. You'll need a high-quality steel tape, a six-foot level, and a notepad to record four distinct data points that define your opening's geometry.
Step 1: Measuring Width (A). Identify the narrowest point between your side studs. As established in our Rule of Three, you must measure at the top, middle, and bottom. Record the smallest of these three numbers as your Width (A).
Step 2: Measuring Height (B). Measure the vertical distance from the floor to the bottom of the header framing. If your finished flooring isn't installed yet, you must account for the thickness of the future hardwood or tile.
Step 3: Measuring Wall Depth (C). Capture the total thickness of the wall. This includes the depth of the structural stud plus the drywall on both the front and back sides. This ensures your jamb sits flush with the wall surface.
Step 4: Floor Clearance. This is the "hidden" measurement. You must determine the gap required between the bottom of the door and the floor to ensure a smooth, unobstructed swing.
Before finalizing your notes, perform a final verification. Use your level to check that the side studs are perfectly plumb and the header is level. If the opening is significantly out of square, you'll need to account for extra shimming space. Once you've captured these details, you can browse our full collection of custom doors to find the style that matches your vision.
The Floor Clearance Factor
Standard interior doors often have a negligible gap at the bottom, but a heavy, real-wood unit requires more breathing room. A clearance of 1/2-inch to 3/4-inch is the industry standard to prevent the door from dragging or catching on floor debris. This is especially critical for a double bookcase secret door, where the increased width amplifies even the slightest floor slope. If you plan to install high-pile carpeting after the door is in place, you must add that carpet's thickness to your clearance calculation now.
Case Molding and Trim Specs
The trim, or casing, is the final piece of the concealment puzzle. Its primary job is to bridge the gap between the door jamb and the drywall, effectively hiding the "seam" of the secret entrance. When measuring for a hidden door, consider the width of your existing home trim. You want the new casing to match the profile and scale of the surrounding rooms. If your home uses 3-1/2-inch baseboards and casing, specifying the same for your secret door ensures it looks like a permanent, undiscovered fixture rather than an afterthought.
Ordering Your Alpha Door: From Measurements to Masterpiece
The heavy lifting of technical preparation is complete. You've navigated the structural bones of your home and captured the precise geometry of your opening. Now comes the most rewarding phase: translating those numbers into a bespoke piece of furniture. When you input your data into the order form for an Alpha Concealment Door, you aren't just buying a product. You're commissioning a handcrafted entrance designed to last for generations.
Selecting your wood species is the first step in defining the door's character. We offer premium options like Oak, Alder, and Cherry. Each species carries unique weight and density characteristics. Oak provides legendary durability and a prominent grain, while Cherry offers a refined, smooth finish that deepens with age. Because measuring for a hidden door involves such tight tolerances, the inherent stability of these real-wood timbers is vital. They resist warping far better than inferior composite materials, ensuring your secret remains secure year after year.
Your final specification must include the swing direction. Deciding between an inswing or outswing configuration isn't just about convenience; it changes how the door interacts with your wall depth. An outswing door typically sits flush with the exterior wall, creating that sought-after "invisible" look. An inswing door is recessed into the opening, which might be preferable depending on the layout of the hidden room. Both require precise clearance calculations to avoid binding against the jamb.
Final Checklist Before Submitting
Before you click submit, take five minutes to verify your findings. Double-check the 'Smallest Measurement' rule. If your width varied across the three points, ensure you've provided the narrowest one. Confirm that your wall depth matches our standard or custom jamb sizes. Finally, physically walk the swing path. It's easy to overlook a light switch, a thermostat, or a piece of crown molding that might obstruct the door's arc. A few moments of vigilance now prevents a lifetime of technical headaches later.
Professional Support and Installation
We believe that high-end craftsmanship should be supported by high-end service. Every order undergoes a technical review by our team. If your numbers look inconsistent or if your wall depth seems unusual, we'll reach out to clarify before production begins. While many homeowners successfully install our DIY Door Kits, complex projects or heavy Double Bookcase Doors often benefit from a professional touch. We maintain a national network of professional installers who understand the nuances of measuring for a hidden door and can ensure your unit is perfectly plumb, level, and square. This final step transforms your raw measurements into a seamless, functional masterpiece.
From Blueprint to Bespoke Reality
You've moved past the initial spark of inspiration and navigated the technical nuances of structural framing. By mastering the Rule of Three and accounting for the subtle complexities of floor clearance, you've laid the groundwork for a flawless installation. Precision in measuring for a hidden door is the final bridge between a standard room and a sanctuary of secret utility. You now possess the data required to ensure your new entrance operates with the silent, smooth precision of a fine piece of furniture.
At Hide-A-Way Doors, we take your exact dimensions and transform them into a legacy piece. Our team has provided family-owned expertise since 2012, ensuring every unit is handcrafted in the USA from premium real wood. Whether you're a seasoned DIYer or plan to utilize our national network of professional installers, we're here to provide the peace of mind that comes from enduring quality. It's time to stop dreaming about your secret room and start building it. Design Your Custom Alpha Door Today and experience the unmatched satisfaction of a perfectly executed project.
Frequently Asked Questions
What is a 'Rough Opening' and why does it matter for a hidden door?
A Rough Opening is the raw distance between the structural wall studs and the header framing before any trim is applied. It matters because a hidden door unit is a self-contained system that must slide into this cavity with enough room for leveling. Without an accurate measurement of the structural frame, you risk ordering a door that is physically too large for the space. This measurement is the bedrock of your project's engineering.
Do I measure from the floor or the subfloor?
You should always measure from the finished floor surface to ensure the door has proper clearance to swing. If you're currently at the subfloor stage, you must add the expected thickness of your future flooring to your calculations. For instance, if you plan to install 3/4-inch hardwood, your height measurement should be reduced by that exact amount. This prevents the heavy bookcase from scraping the floor once the project is finished.
What if my doorway isn't perfectly square or level?
If your opening is out of square, you must rely on the smallest width and height measurements you recorded. Professional installers use shims to level the door jamb within an imperfect opening, ensuring the door itself remains perfectly plumb even if the house has settled. Relying on the smallest point prevents the unit from binding against the structural framing. This approach is essential for maintaining the "illusion of the seam."
How much should I subtract from my rough opening for the door size?
You must subtract 2 inches from both the width and height of your smallest Rough Opening measurement. This standard deduction provides a 1-inch buffer on all sides of the door jamb for shimming. This space is essential for adjusting the unit into a perfectly level position. When measuring for a hidden door, this subtraction ensures the heavy frame fits comfortably within the structural studs without compromising the wall's integrity.
How do I measure the wall depth for a custom jamb?
Measure the total wall thickness from the finished drywall face on the front to the finished drywall face on the back. This total depth determines your required jamb size. Most modern homes utilize a 4-9/16 inch jamb for 2x4 walls or a 6-9/16 inch jamb for 2x6 walls. Capturing the exact depth at multiple points ensures the door sits flush with the wall surface, which is vital for maintaining a secret entrance.
Can I install a hidden door in an existing doorway without removing the drywall?
You can install a unit into finished drywall, but we strongly advise removing the casing to expose the raw studs. Measuring for a hidden door against drywall is often inaccurate because mudded corners and uneven tape can hide the true structural dimensions. Exposing the framing allows you to secure the heavy pivot hinges directly into the load-bearing wood. This ensures long-term stability and prevents the door from sagging over time.
Does the type of flooring (carpet vs. hardwood) change how I measure?
The flooring material dictates the amount of clearance needed at the bottom of the door frame. Hardwood or tile typically requires a 1/2-inch gap, while thick carpeting often needs 3/4 of an inch to swing freely without dragging. If you're planning a transition between rooms with different floor heights, always measure from the highest point. This ensures the bookcase clears the carpet pile throughout its entire path of travel.
What is the standard width for a single bookcase door?
Standard widths for a single bookcase door typically fall between 30 and 36 inches. These dimensions align with the most common residential doorway sizes found in modern construction. While we manufacture custom widths for unique spaces, staying within these parameters ensures the door remains manageable and the weight is well-distributed across the pivot system. A 32-inch door is often considered the ideal balance of storage utility and aesthetic proportion.