Mastering Hidden Door Installation: A Professional Guide for Homeowners in 2026
The most impressive secret door in the world is worthless if it drags against the floor every time you open it. You've likely envisioned a seamless bookcase swinging open to reveal a private sanctuary, yet the fear of a sagging frame or a complex rough opening often stalls the project. It's a reasonable hesitation. The sheer weight of solid wood and a full collection of books demands more than a standard entry can provide. You want the intrigue of a hidden room backed by the peace of mind that comes from rugged, dependable craftsmanship.
This guide delivers the professional blueprint for a successful hidden door installation, focusing on the structural integrity required for a flush, invisible finish that lasts a lifetime. We'll bridge the gap between initial inspiration and technical execution. You'll learn how to master precise measurements, reinforce your wall for heavy loads, and navigate the step-by-step process to ensure smooth operation. We'll cover the critical framing requirements and the subtle finishing details that transform a standard wall into a master-crafted secret passage.
Key Takeaways
Identify the structural reinforcements necessary to support the immense weight of a fully loaded solid wood bookcase without compromising your home's integrity.
Navigate the step-by-step process of a professional hidden door installation, from verifying a plumb rough opening to aligning the heavy-duty pivot system.
Determine whether your carpentry skills match the precision needed for a master-level finish or if the weight liability of a handcrafted unit requires professional expertise.
Learn the seasonal maintenance secrets, including hinge lubrication and humidity management, that keep your secret entrance operating silently for decades.
Understanding Hidden Door Installation: More Than Just a Hinge
A true secret entrance is an architectural feat, not a simple furniture swap. While mass-market kits often treat these units like a standard bookshelf with a hinge, a professional hidden door installation requires deep integration into your home's framing. This process draws inspiration from the long history of secret passages, where utility met elegance through master craftsmanship. The goal isn't just to hide a room; it's to create a functional piece of art that operates with silent, heavy-duty precision.
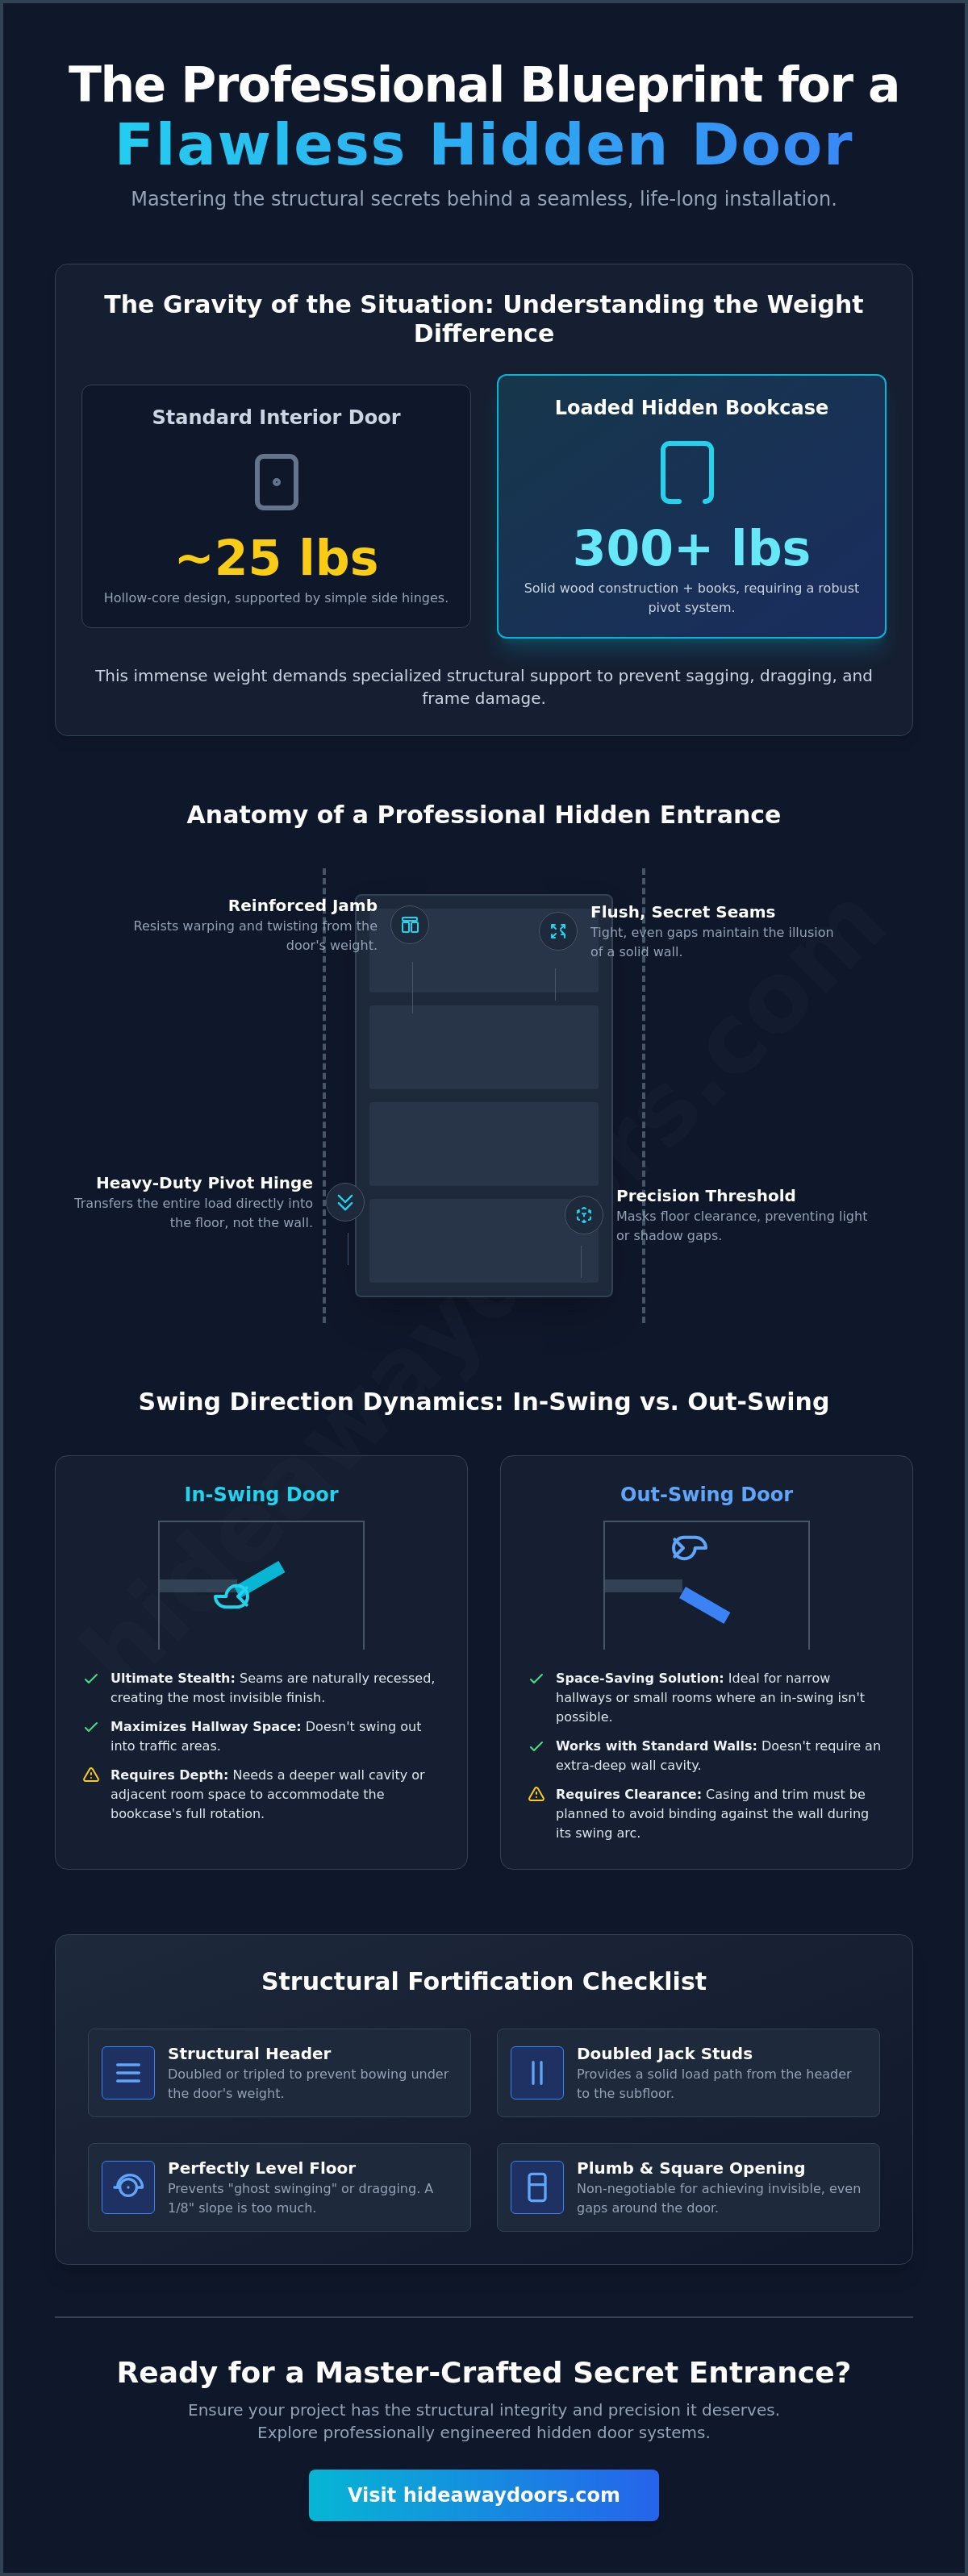
The "stealth" requirement is the most demanding part of the build. If the jamb is slightly out of plumb or the casing has uneven gaps, the illusion vanishes instantly. Even the floor clearance must be exact. A gap that's too wide reveals the shadow of the room beyond, while a gap that's too tight risks dragging against the floor as the house settles over time. At the heart of this movement is the pivot hinge system. Unlike standard side-mounted hinges, a pivot system transfers the weight directly into the floor, allowing the door to handle hundreds of pounds without sagging or pulling on the drywall.
The Anatomy of a Professional Hidden Entrance
Quality begins with a reinforced jamb. Because a real wood Alpha concealment door carries significant weight, the surrounding frame must resist warping or twisting. Real wood behaves differently than cheap MDF; it breathes and moves with the seasons. This means your installation tolerances must account for natural expansion while maintaining tight, secret seams. The threshold also plays a vital role. A well-designed threshold masks the floor clearance, ensuring the bottom of the door remains invisible to the casual observer even when you're standing directly in front of it.
In-Swing vs. Out-Swing: Choosing Your Path
Your choice of swing direction changes the entire dynamic of the room. Out-swing doors are excellent for narrow hallways where you don't have space to push a bulky unit inward. However, they require careful planning to ensure the casing doesn't bind against the wall during the arc of the swing. In-swing doors are often preferred for the ultimate "invisible" look because the seams are naturally recessed into the wall cavity. While they maximize hallway space, they require a deeper wall cavity to accommodate the full depth of the bookcase as it rotates. Both styles require a meticulous hidden door installation to ensure the pivot point is perfectly aligned with the face of the wall for a flush finish.
Structural Preparation: Ensuring Your Wall Can Support a Real Wood Door
Most homeowners underestimate the gravitational pull of a private library. A real wood Alpha concealment door isn't merely a decorative partition; it is a heavy, functional piece of cabinetry that can weigh hundreds of pounds when fully loaded with books or collectibles. Without proper structural preparation, even the most expensive unit will eventually sag, ruining the "flush" look and causing the door to bind. Success in hidden door installation begins long before the door arrives, starting with the skeleton of your wall.
Standard interior framing is designed for hollow-core doors that weigh very little. When you introduce a high-weight pivot system, you must rethink the header and the studs. A structural header, often doubled or tripled depending on the span, is non-negotiable to prevent the weight from bowing the top of the frame. Additionally, your floor must be perfectly level. A mere 1/8-inch slope across the opening can cause a heavy door to "ghost" swing or drag, destroying the illusion of a secret entrance. Precision is your only protection against a failing installation.
Reinforcing the Rough Opening
Your rough opening needs to be a fortress of stability. This means doubling up your jack studs to provide a solid path for the load to travel from the header down to the subfloor. When planning the architectural details for hidden doors, ensure every stud is perfectly plumb. If the wall is leaning even slightly, the door will never sit flush with the casing. For a 500lb door load, the maximum allowable deflection of the header must not exceed 1/360th of the span to maintain a perfectly invisible seam.
Managing Weight and Floor Loads
The floor carries the true burden of a pivot door. While standard joists are usually sufficient, you should assess if your subfloor needs additional blocking or bracing, especially if the door sits parallel to the joists. Different floor types require different considerations. Tile needs a perfectly flat surface to prevent cracking under the pivot point, while carpet requires a specific clearance height to avoid unsightly drag marks. Real wood is the only logical choice for these high-stress environments. Unlike MDF, which can crumble or strip under the constant tension of heavy-duty screws, real wood offers the enduring fiber strength needed for long-term structural integrity. If you're ready to begin your project, exploring professional-grade DIY door kits can help you establish the correct framing foundations.
DIY vs. Professional Installation: Navigating Complexity and Weight
Choosing between a weekend project and a professional service comes down to your comfort with high-stakes precision. A hidden door installation isn't a standard trim job; it's a mechanical alignment where every fraction of an inch counts. While a seasoned woodworker might enjoy the challenge, the "Weight Liability" factor remains the primary concern. If a 500lb unit isn't anchored correctly to reinforced framing, you aren't just risking a sagging door. You're creating a potential safety hazard for your family.
For many homeowners, a DIY hidden door kit provides the perfect balance of quality and personal accomplishment. This path is ideal if you have a solid grasp of basic carpentry and a full day to dedicate to the process. You'll need more than a hammer and a screwdriver. A professional-grade laser level is mandatory to ensure the jamb is plumb in three dimensions. You'll also need a variety of composite shims and heavy-duty structural fasteners to secure the unit permanently.
The DIY Path: What You Need to Know
Success in a self-managed install depends on your tools and your patience. Common pitfalls often occur during the final adjustments. Homeowners frequently over-tighten the pivot hinges too early, which can strip the wood or prevent the door from swinging freely. Another frequent error is miscalculating the swing clearance, especially with out-swing units that must clear existing trim. Starting with a "paint grade" or unfinished kit is often the smartest move for DIYers. It allows you to sand, shim, and adjust the unit without worrying about ruining a factory-perfect stain finish during the learning curve.
When to Call the National Installation Network
If your project involves a Double Bookcase Door, a Wine Rack Door, or a high-security Gun Cabinet Door, the complexity shifts significantly. These units require synchronized movement and perfect floor leveling across a much wider span. This is when a professional hidden door installation becomes invaluable. A trained crew can typically complete the work in about four hours, while a first-time DIYer might spend twelve hours troubleshooting a single hinge arc. Beyond the time savings, professionals offer a warranty on their labor. This provides long-term peace of mind that your secret entrance will remain silent and secure for decades. You'll achieve a master-crafted finish that blends seamlessly with your existing high-end cabinetry, ensuring the secret stays safe from even the most observant guests.
Step-by-Step Guide to a Flawless Hidden Bookcase Door Installation
The actual hidden door installation begins with a final audit of your rough opening. Even if you followed the structural guidelines in previous sections, wood can shift during construction or as the house settles. Use a high-quality laser level to verify that your jack studs are perfectly vertical. If the frame is off by even a fraction of an inch, the door will bind or reveal uneven gaps that ruin the illusion. Once verified, secure the jamb using structural screws, shimming directly behind the pivot points to ensure the frame doesn't bow under the weight of the unit.
Installing the pivot system is the most critical technical step in the entire process. This hardware doesn't just hold the door; it manages the entire load path into the floor. Align the top and bottom pivot points with obsessive precision. A slight misalignment here creates friction that will eventually wear down the hardware and lead to the sagging homeowners fear most. Once the door is hung, test the swing immediately. It should move with a light touch, operating with the "one-finger" smoothness that defines a professional, master-crafted build.
The Secret is in the Casing
Concealment is won or lost in the trim work. To achieve total invisibility, you must master the "shadow gap." This is a consistent, narrow space around the door that mimics the natural shadows found in standard trim. If your home features heavy baseboards or crown molding, you must cut these at precise angles to ensure they clear the wall during the door's rotation. Using zero-clearance hinges allows the door to sit flush with the surrounding casing, making it indistinguishable from a stationary built-in. If you want to see these details in practice, you can shop our professional door collections to find the perfect match for your home's aesthetic.
Fine-Tuning the Movement
Vertical alignment is only the beginning of the calibration phase. You must also adjust the tension of the pivot points to account for the weight of your specific collection. If the door rests slightly ajar, install a heavy-duty magnetic catch or a mechanical latch hidden within the shelving. These components provide a satisfying "click" that confirms the door is fully seated and flush with the wall. Testing the swing-back is vital; the door should never drift open on its own, which is a common sign of an unlevel installation.
The final step is the load test. Fully stock your shelves with books or the items you intend to display. A handcrafted wood door might behave differently under a 200lb load than it does when empty. Check the seams again while the door is under full weight. If the gaps remain consistent and the operation stays smooth, your installation is a success. This rigorous testing ensures the structural longevity we discussed earlier, giving you a secret passage that functions perfectly for a lifetime.
Beyond the Install: Maximizing the Longevity of Your Handcrafted Door
Completing a hidden door installation is a significant milestone, but the lifecycle of a master-crafted entrance extends for decades. Real wood is a living material. It responds to the environment. Unlike static furniture, your secret door is a mechanical assembly that requires occasional attention to maintain its silent, stealthy operation. Rugged, dependable craftsmanship ensures a lifetime of use, but the homeowner's role in preservation is what maintains the "wow factor" long after the initial reveal.
As humidity levels shift between summer and winter, your door might expand or contract. This is natural. A precision-engineered door accounts for this, but you should monitor the "shadow gaps" discussed earlier. If the seams appear tighter in July than in January, it's simply the wood breathing. Maintaining a consistent indoor climate helps, but the inherent strength of real wood ensures these minor shifts won't compromise the structural integrity. Proper weight management is also an art. For a hidden wine cellar door, place the heaviest bottles closest to the pivot hinge. This reduces leverage on the hardware and keeps the swing effortless. Periodically check the heavy-duty pivot hinges for debris. A small application of high-quality lubricant every few years ensures the movement remains whisper-quiet.
Post-installation is the perfect time to enhance utility. Many homeowners integrate electromagnetic locks or biometric scanners to secure their private spaces. These systems provide modern security without disrupting the traditional aesthetic of the wood. This intersection of secret utility and elegant design is where your home truly becomes a sanctuary.
Wood Care and Finish Maintenance
Real wood demands respect. While mass-market materials are often disposable and crumble under repair, your handcrafted door is built for permanence. Use a microfiber cloth and a dedicated wood cleaner to preserve the furniture-grade finish. If a high-traffic entrance suffers a minor scuff, real wood allows you to sand and refinish the area. This is a primary advantage over inferior materials; you can restore the tactile quality of the wood whenever necessary, ensuring the finish always matches your existing cabinetry.
Adapting the Space
If you decide to reconfigure a secret pool cue rack door into a different display, you may need to re-balance the load. Ensure the center of gravity remains stable to prevent the door from resting ajar. Integrating smart home sensors can also provide alerts if the door isn't fully closed. Our commitment to lifelong structural support means your hidden door installation remains a source of pride and security for as long as you own your home. It's a legacy of precision and hard work that stands the test of time.
Secure Your Legacy with Precision Craftsmanship
A successful hidden door installation is the ultimate intersection of security and sophisticated design. By prioritizing structural reinforcement and meticulous alignment, you transform a standard wall into a functional piece of art that remains flush and silent for decades. Whether you choose the path of a dedicated DIYer or leverage a professional network, the foundation must always be rooted in quality materials and time-honored techniques. The difference between a simple shelf and a master-crafted secret passage lies in the attention to detail during the framing and finishing phases.
Since 2012, our family-owned business has specialized in creating these secret entrances. Every unit is handcrafted in Morristown, Tennessee, using only real wood to ensure lasting durability that MDF simply can't match. If you're ready to add a touch of mystery and high-end utility to your home, we're here to help you navigate every step from dreaming to doing. You can browse our collection of handcrafted Alpha Doors and professional installation services to find the perfect fit for your space. With our national network of professional installers, achieving a master-artisan finish is within reach. Start your project today and experience the peace of mind that comes from enduring quality.
Frequently Asked Questions
Can I install a hidden door in an existing doorway without tearing out the drywall?
You can install a hidden door into an existing opening, but achieving a flush finish usually requires removing the existing door and trim. For a truly invisible hidden door installation, the unit must sit within the wall cavity. This often requires minor drywall adjustments to ensure the new jamb fits perfectly against the studs, though surface-mount options exist for less invasive projects.
How much weight can a standard hidden bookcase door actually hold?
A professional-grade bookcase door built from real wood can typically support between 300 and 500 pounds of weight. This capacity depends on the use of a heavy-duty pivot system that transfers the load directly into the floor. Standard shelving is designed to remain rigid under the weight of a full collection of books without bowing or compromising the swing.
Do I need a special type of hinge for a heavy real-wood secret door?
Yes, a heavy real-wood door requires a specialized pivot hinge system rather than standard side-mount hinges. Pivot hinges are engineered to handle the substantial weight of solid wood and loaded shelves by supporting the door from the bottom. This prevents the sagging and frame warping that common hinges would suffer under such high-weight loads over time.
Will a hidden door installation affect my home’s resale value?
A high-quality hidden door installation often increases home resale value by adding unique architectural intrigue and functional security. In luxury markets, a well-executed secret room can see a high return on investment because it serves as a memorable "wow factor." It differentiates the property from standard listings while providing practical utility for storage or safety.
What is the difference between a "rough opening" and a "finished opening" for hidden doors?
The rough opening refers to the initial framed space between the wall studs, while the finished opening is the final space available after drywall is installed. For hidden doors, the rough opening must be precisely square and plumb to accommodate the door's jamb. We provide specific dimensions for both stages to ensure your unit fits with the tight tolerances required for concealment.
Can a hidden door be used as a fire-rated entrance or a safe room door?
Hidden doors can be used for safe rooms, but they must be specifically engineered with reinforced materials and locking mechanisms to meet those security needs. While a standard bookcase door offers excellent concealment, a true fire-rated entrance requires specialized cores and hardware that comply with local building codes for egress and safety standards.
How do I hide the gap at the bottom of the door without it dragging on the floor?
You can hide the bottom gap by using a custom threshold or a "shadow gap" design that makes the space appear as a natural part of the trim. Professional installations often include a sweep or a recessed baseboard that moves with the door. This ensures the opening remains invisible while maintaining enough clearance to avoid dragging on the floor surface.
What happens if my floor is not perfectly level during installation?
If your floor isn't level, the door will likely "ghost" swing or bind against the frame. You must use shims under the pivot point or level the subfloor before the hidden door installation begins. Ensuring the top and bottom pivot points are perfectly aligned vertically is the only way to guarantee a smooth, effortless swing that stays where you leave it.